Wednesday, 31 August 2011

Go Fish.

Bit different today. I painted a fish on my finger. Not an actual fish, well anyway here it is - 


I also painted my thumb to look like.....sea grass? I've no idea what it's called! - 


Don't really know why I did this look. For fun I guess! Who ever said you can't paint a fish on your nails anyway?!

Quite a few colours for this one - All Barry M - 
- 294 Cyan Blue
- 66 Matt White
- 301 Block Orange
- 290 Spring Green
- 299 Racing Green
- 47 Black

- So to begin, two basecoats
- Two coats of blue -


- I physically cannot get over how beautiful this colour is.
- Next I started on the white details - 


- I used a small dotting tool as a pencil to draw the bubbles, and a small brush to do the base for the fish and grass
- You want to do a white basecoat when using bright colours like orange and green, as they will show up a lot better and true to colour. If I were to use them straight on top of the blue they would come out dark and murky! Trust me I tried it!
- I next finished off the fish - 


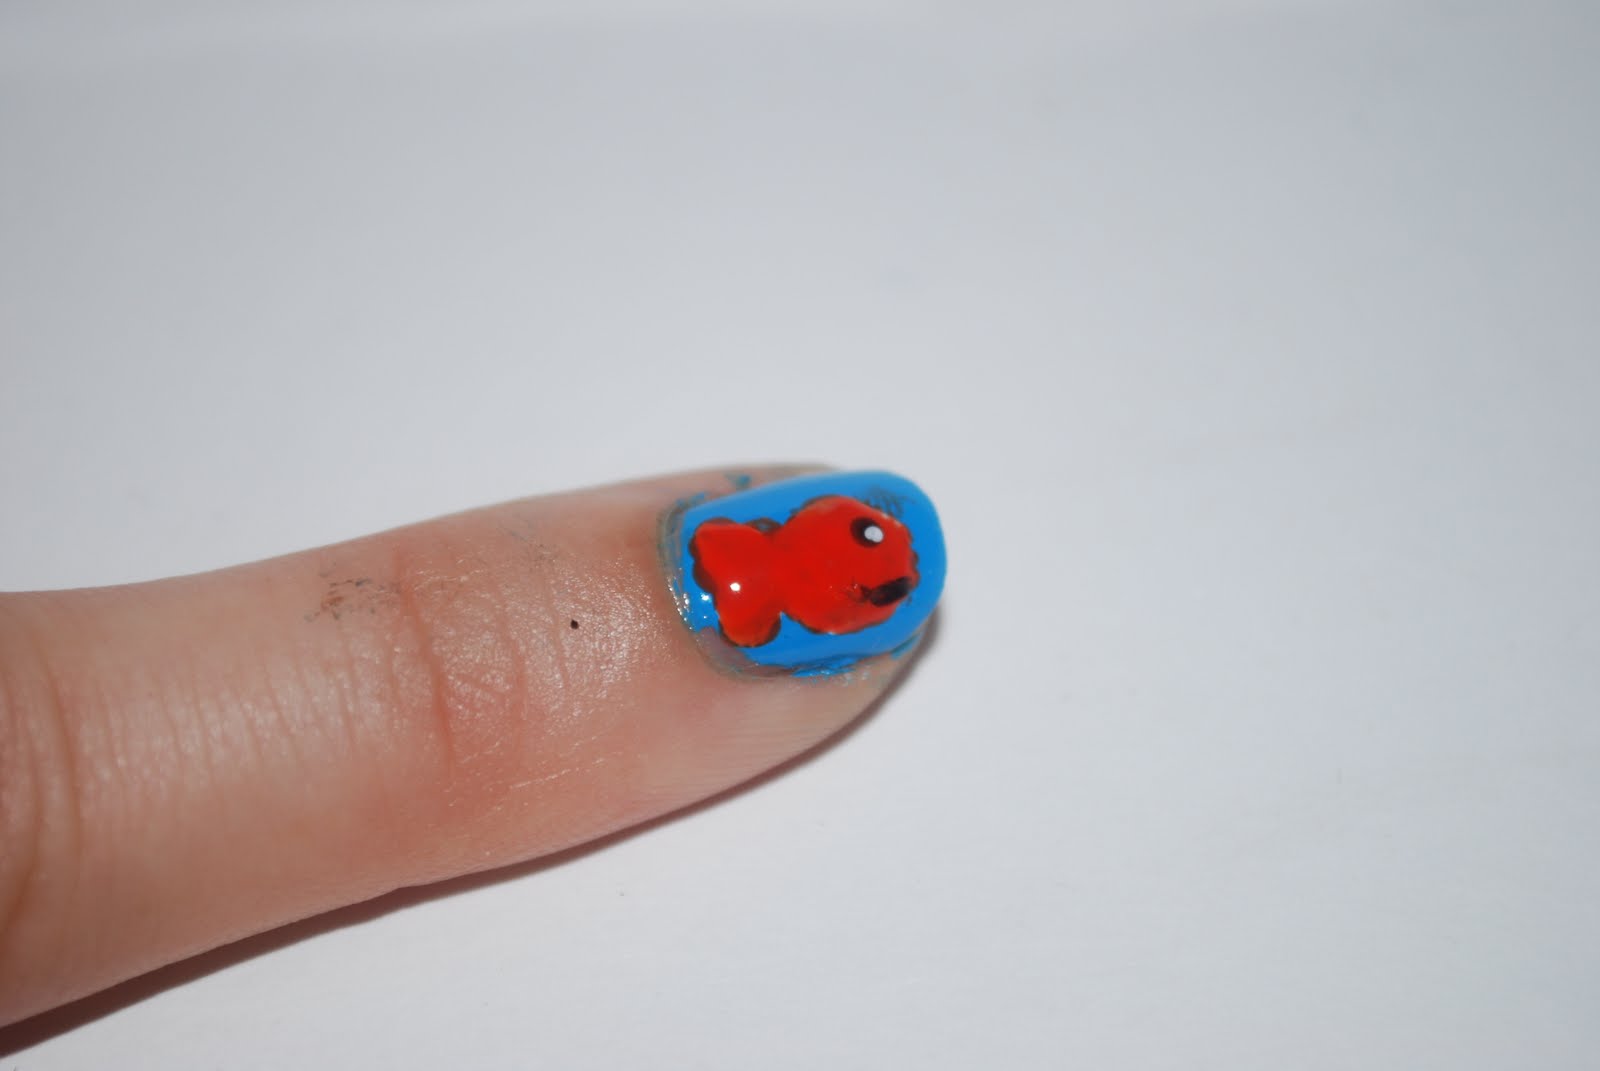
- Again I used a small brush to paint the orange over the white, and a dotting tool to do the eye and mouth. I used two sizes of dotting tool to do the eye, to get the smaller white dot inside the black dot.
- Next I finished off the grass using the two shades of green - 


- As before I used a small brush to do the light green and a dotting tool for the darker green, just to create a bit more dimension
- Finish with a top coat.


Not the most obvious choice of nail design, granted. But like I said, why not eh?!!!

See you Friday!

WN x

Sunday, 28 August 2011

Time For Teal

Those of you who follow me on twitter (@WellNailed), will know that I have been searching for a teal varnish, and I found one!! It's from Boots No7 Range, it's called Totally Teal, and it looks like this - 


It costs £7, but I had my £5 voucher so it was only £2! Bargain! This is with two coats. It's such a gorgeous colour! Perfect for the Autumn transition too. 
A lot of people either love or hate teal, bit of a marmite effect!! But I absolutely love it!!!
Now, being me, I can't just leave a plain colour on my nails, so I painted them to look like fish scales - 


Obviously.
I used a little dotting tool like a pencil to just draw the design on.
The colour is Barry M 288 Silver.

That's it for this one really! I just wanted to share my fabulous new purchase.

'Till next time...

WN x

Wednesday, 24 August 2011

Gooooooldfinger!

Last week I received my first ever Glossybox, and I was so excited! Partly because I got a nail product, which I was chuffed about, so I could share it with you guys, but mainly it was because I won a prize! 
Now, I must point out that I actually do never win anything, so I cannot tell you how giddy I am about getting my prize! (Obviously I'll be letting you all know what it is when it arrives!)

So, if you don't know about Glossybox, basically you pay a monthly subscription of £12.95, and every month you receive a gorgeous pink box with 5 products inside. The products are pretty generous sample sizes but also full size too, which is just fabulous!! I know they have Birchbox in the US also. Such a brilliant concept. Check out www.glossybox.co.uk for more details! 


Anyway, why I'm telling you all this is because inside my box I got a set of gold Rebel Nails nail wraps! 
I would just like to say Oh My God.
I've never really got into wraps (I'm hardcore varnish!!) but dude, these things are amazing!
I cannot recommend them highly enough!


Here is what they look like finished - 


I mean you can see how shiny they are from the flash of my camera! Also I can actually see myself in them. Can you tell I'm excited?! I bloody love 'em!

Anyway, this is the packaging - 


That's just a sticker on the front telling me I'd won my prize!!

- So in the packet you get 16 stickers in eight different sizes Two of each. Obviously.
- With the clear size guide, you wrap it around your nail to decide which size sticker you will need.
- When you've selected your size, you need hold the flat edge between your thumb and forefinger, and warm up the sticker at the curved end, until it begins to curl - 


You can see it's just beginning to curl at the bottom corner.

- The instructions recommend using a hairdryer, but I actually held mine over a candle! Ofcourse I did. Careful not to hold it too close though, otherwise it will melt!! You want the sticker about 20cm away from the flame.
- Next, lay the sicker, curved edge to cuticle, on your nail.
- Smooth out until it lays flat on the nail surface - 


- Then simply file off the excess to finish. You want to file at a 45 degree angle to your nail in a downwards motion.

DONE!

Sounds like a lot to do, but they really take no time at all (once you get the hang!) and you can power through them no problem.
Lat fabulously aswell. At the time of writing this post, mine are three days old and still look as good as they did when I first applied them.

So - For fabulous, easy, quick nails check out www.rebelnails.co.uk
    - For more info on Glossybox check out www.glossybox.co.uk

Also NO, I wasn't paid to promote them! I'm doing it because I love them!

Stay fabulous guys :)

WN x

Half Way Line

Sometimes, I just pick up colours and go with it. And this was definitely one of those!
I find inspiration in a lot of places, but a lot of the time I just really fancy doing something new and spontaneous. Sooooo, here's what I did - 


Nice!

The colours were all Barry M once again, 307 Lemon Ice Cream, 301 Block Orange, and 291 Cobalt Blue.

- To start, two basecoats
- Next the yellow - 


- It needs three coats to come out this opaque
- I then painted half my nail with the orange - 


- I didn't tape off my nail or anything like that to do this. Partly because I couldn't be bothered, but I also wanted to see how it looked if I did it freehand. Not too bad, I don't think!
- Next, using my dotting tool, I did the blue dots down the line where the colours meet
- Top coat, to finish

I think designs come out better when you just get creative and do whatever you feel like.

Super easy and a fabulous effect!

See you next time...

WN x

Friday, 19 August 2011

Pick Your Own

I know, practically EVERY blog out there has their own example of this look, so I thought why the hell not?!?!
I don't know if you may have guessed from the title, but today's look is the famous Strawberry.
Congratulations if you did guess it by the way.
So here is my take on the Strawberry nail - 


Nom.

Three colours for this, all Barry .
- 262 Bright Red
- 290 Spring Green
- 66 Matt White

I also used a dotting tool for, well, the dots. Obvs.

- Two basecoats to begin
- Then two coats of the red
- Spray of quick dry - 


- I then painted two coats of the green diagonally over each corner of my nail - 


- Next, using the dotting tool, I added the white dots
- Top coat to end.

I really like this look (any variation of it!). And I think it's just so fun especially for summer when you actually can pick your own.

This is me trying to extend the summer for as long as I can! 

Enjoy kids. Also if you have your own version of this look I'd love to see it, so feel free to tweet me a picture! - @WellNailed

Bye for now

WN x


Thursday, 18 August 2011

Watch It Glitter!

So, unintentionally, this look has kind of come out a bit Christmassy! Never the less, I still love it and I think it looks fabulous. Here they are -  


Right?!

Anyway, only one polish for this look Barry M 288 Silver.

- So I started, as always, with two basecoats.
- Then three coats of silver - 


- This polish needs three coats to make it this opaque.
- Spray of quick dry.
-You want the nails to be dry before you pour over your glitter as if they are still wet, glitter will stick where you don't want it!
- Next I painted clear varnish across the tip of the nail
- Over a folded piece of paper, which has been laid out flat, pour the glitter over the tip of the nail - 


- I used my 'Hobbycraft' glitters, and a fanned brush to get the excess from my finger.
- As the paper already had the crease in it from the fold, I could just fold the paper back in half and pour the excess back into the tube.
- Top coat to finish

A bit more festive than I had in mind! I do think the effect is great though. I would probably only do one colour, if I was going somewhere, like an event or party, to keep it sophisticated.

I do love a bit of sparkle all year round!

Tata kids and Enjoy! :)

WN x