Thursday, 29 September 2011

(Sherbet) Dib Dab

Today's look is a bit softer, a bit more free than the usual looks.
I wanted to do something where, if you mess up, it can actually add to the look - 


See what I mean?!!

The colours I used are all Barry M - 300 Acid Yellow, 302 Fushia and 292 Navy.

- So, the usula, basecoats to begin,
- Then two coats of the divine Acid Yellow - 


- Next, take some of the pink, and put it on a surface that you don't mind wrecking! Like an old magazine or something.
- Then, just take a cotton bud, and dab to pink colour on to the nail. I concentrated the colour in the middle of my nail, but took it all the way to both ends - 


- Finally, I took the navy using the same technique, with the cotton bud, lightly dabbing across the nail to create the stripes.
- Top coat to seal.

As you can see, it can get quite messy, but don't worry, that's kind of the point! Just use a cotton bud to clean up after.

Have a play, see what colour combo's work for you, and have FUN!

Adios!

WN x

Sunday, 25 September 2011

Too Graphic?

Today, we're going a bit abstract, a bit graphic-y!
I've not really tried anything like this before, but I think they turned out alright for a first attempt! - 


I used only the two colours for this, Color Trend Colour Me Pretty Nail Polish in Surf and Barry M 161 Vivid Purple.

- Basecoats to start with
- Then I needed four coats of the Surf to get it opaque - 


- Even with four coats, it's not quite as opaque as I'd like, but I'm not gonna moan for 99p!
- Next just take a small, thin, brush and paint the stripes on in whatever pattern takes your fancy.
- Top coat to end.

So easy! 
I love that something so easy as putting a few stripes of colour on your nail can give such a cool, and individual effect. 

Happy experimenting!

WN x

Thursday, 22 September 2011

Shiny Spots

I bloody love it when the Avon lady arrives! My dog does too, but that's for a different reason....
This time I got three 'Color Trend' Varnishes 'cos, well, they were 99p.
So, as with every Avon delivery, I picked my faves and I did a blog!

Here's the look I did - 


Really easy peasy and super shiny! A favourite combo of mine :)

The colours I used for thris are-
- Color Trend Colour Me Pretty Nail Varnish in Minimalist Peach
- Avon Nailwear Pro in Sequinned Turquoise
- Barry M 295 Pure Turquoise

- Basecoats to begin
- Then three coats of the peach - 


- This is how it is on it's own with the three coats. I think it's so beautiful!!
- Next just dot the colours on however you want, in whatever order.
- I used my dotting tool for this, but like I've said before hair grips, toothpicks, general pointy object will work just as well!
- Then top coat to seal.

If you start your dots at each end and then work your way to the middle, you will find they come out a lot more even, as opposed to if you just freehand them.

Unfortunately, the Sequinned Turquoise from Avon was limited to a gift set, but my fabulous rep gave me hers!

Hope everyone has an amazing weekend ;)

Catch you next week

WN x

Wednesday, 21 September 2011

Red, Red Wine

My fabulous mum came home with two Barry M polishes for me the other day. Very exciting stuff!
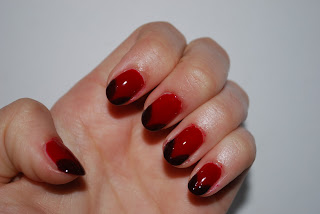
She got me 1a Red Wine and 115 Red Black. And here is what I did with them - 


I know they're a mess!
- So, basecoats to begin
- Then, two coats of the lighter red
- Next add two coats of the dark red to the tip. I found it easy to do this, by holding the brush facing the side of my nail and sweeping it round in a circular motion to the tip.
-Top coat to end.

I wanted to keep it nice and chic today, giving a classic red nail a bit of a twist.

I also added some black rhinestones, just because I can't leave 'em alone! - 


Ta-da! The end :)

See you Friday kids

WN x

Saturday, 17 September 2011

Jelly Beans :)

I don't know about you, but I find inspiration in the most obvious of places.....


This time, it was this mug - 


I mean, ofcourse!
This mug has been sat in my room for ages, and yesterday I thought, I can do nails with that. So I did. And here they are - 


Jazzy.

All Barry M again! (sorry!)

- 66 Matt White
- 1a Red Wine
- 301 Block Orange
- 134 Yellow
- 290 Spring Green
- 204 Cyan Blue

- So, bascecoats to begin
- Then, two coats of the white
- Next, two coats of the colour (whichever order you choose) in the shape of the jelly beans!
- Top coat
END!

So easy and relatively quick. And, with patients, you can just use the brush that comes with the varnish to do the shapes. Again don't worry about making a mess, remember the cotton bud/varnish remover combo!!

I enjoyed doing this look, it was a lot of fun, and that's what it's all about.

See you next time lovlies :)

WN x


Thursday, 15 September 2011

Feelin' Blue

According to, well, everyone, blue is it at the moment.
If you haven't seen Chanel's 'Les Jeans De Chanel', have a look immediately and you will know exactly what my inspiration was.

Here is the look I created - 


It just came out of the blue. HA!

I used three BarryM shades for this one 25 Pure Turquoise, 291 Cobalt Blue and 292 Navy.

Nice and easy peasy.
- Basecoats to begin
- Then, two coats of the turquoise - 


- Next, I painted two coats of the cobalt across the middle of my nail - 


- Then two coats of navy across the tip
- Top coat to end.

Super fun and apparently bang on!!

Have a fabulous weekend :)

WN x

Tuesday, 13 September 2011

The New French

I recently came across a video by the uber fabulous Lisa Eldridge, in which she has her nails done by the equally as fabulous Sophy Robson. A look she has named 'The New French'.
You will find it on Lisa's Youtube channel - lisaeldridgedotcom


So I thought I would give this beautiful look a go! And here's how they turned out - 

This was my first attempt, and I'm pretty happy with how they turned out!
They were quite a bit easier than I had initially anticipated, and for such a simple idea, I think it gives just the most chic effect!

Just two colours for this look Avon Nailwear Pro in Vanilla Shake and 136 Tangerine by Barry M

- First step was the basecoats as always!
- Next I used three coats of the Vanilla to make it really opaque
-Then after that, I painted two coats of the tangerine across the edge of my nail. You want to go right from the corner of your nail to the middle, and repeat on the other side.
- This can get a bit messy! But don't fear, a cotton bud dipped in nail varnish remover is your friend here. :)
- Top coat to end.

That really all there is to it!

I think this look is so fabulous and sophisticated, and really suitable for any elegant occasion.

You can find Lisa and Sophy at their respective websites - www.lisaeldridge.com and www.sophyrobson.com.
They're also both on twitter @Lisa_Eldridge and @sophynails

See you all soon!
WN x

Sunday, 11 September 2011

Ladybirds!

So, I thought we'd have a bit of fun today at WellNailed because, after all, that's what we're all about. As you may of guessed from the title of this post, I did Ladybirds - 


So cute!

The colours I used for this look are all Barry M 
- 262 Bright Red
- 47 Black
- 66 Matt White

- To begin, two basecoats and then two coats of red - 


- Next, using a small brush from my set off ebay, I painted the black detail down the middle of my nails - 


- Then came the spots, using a dotting tool - 


- And finally, the white spots for eyes
- Top coat to seal.

Don't forget, you don't need dotting tools for this kind of thing. You can use anything, from a hair grip to a toothpick!

I love doing this kind of look, just lots of fun!!

Hope you all enjoy ;) 
See you next time,

WN x

Friday, 9 September 2011

e.l.f. Magic

So this week my first ever (I am ashamed to say!) e.l.f cosmetics order came in the post, and I cannot tell you how much I am impressed with their products.
The majority of the products cost only £1.50! If, like me, you are a bit skeptical as to the quality of the products, please just try them you will be very pleasantly surprised!!!


Now, as I'd never tried e.l.f before, I only placed a small(ish!) order. Well small in cost anyway!


And, without further ado, here are the nail varnishes I got - 


I binged on red.
The colours from left to right are - Red Velvet, Cranberry and Burgundy. I also got their Matte Finisher which is, obviously, a matte top coat.

Here is what they look like - 


This is with two coats of each, and the colours are in the same order left to right.
As you can see they are absolutely beautiful!
They all have a lovely subtle glitter running through them, and just go on like a dream.

Ofcourse, I also used the matte top coat on all of them - 


I know, it's fabulous. I must say, I wasn't expecting great things from e.l.f (sorry guys!!), but I am now 100% converted!!

All the varnished cost £1.50.

Thanks for coming, see you Monday ;)

Also, go to www.eyeslipsface.co.uk for bargains galore!

WN x

Tuesday, 6 September 2011

Effective Effects

So, I got my paws on a couple of other Barry M Nail Effects and thought I'd just have a play around and see what happened! And well, here's what happened - 


Properly jazzy. 
The Barry M Nail Effects colours are 
- 315 Blue Print
- 316 White Frost
- 314 Pink Fizz

- To start, the usual basecoats ;)
- Then as a base for the crackle colours, I used two coats of Barry M 310 Mushroom - 


- I think this colour is SO elegant! A real classic.
- Next, I painted the crackle colours over my nails, in a diagonal.
- Top coat to finish

It really is so, so simple to do! I really love the effect too :)

Very effective nail effects if you ask me! See what I did there?!

Yeah......

Have a fabulous day :)

WN x

Monday, 5 September 2011

Matte Mani

Yeah Avon!
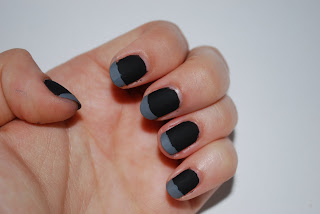
So I got my first ever Matte varnishes from Avon and thought I would share them with you! I decided to just do the classic mani but with a twist - 


As you can see, not quite a 'classic' man!

The polishes are both Avon Matte Nailwear and I can't remember what the colors are! Obviously they are black and grey!

- Don't start with a basecoat! I know crazy. But If you do the polish will dry like a crackle polish. Trust me, I tried it by accident! I'm not sure if a matte top coat would work as a basecoat, as I don't have one!!
- Add manicure strips to the tips of your nails - 


- Then, two coats of the black
- Remove mani strips - 


- Next, just fill in the tips with the grey.
- Normally, I would say finish with a top coat, but as I said earlier, I don't have one! However I do have one en route which I ordered from e.l.f so I will let you know how it is when it gets here!
I LOVE the effect matte colours give.I think they're so sophisticated. And I can't wait for my top coat to arrive so I can make every colour matte!

See you next time 

WN x

Thursday, 1 September 2011

Ma-Ma-Mavala

Pretty much love Boots. I went recently (again), and found this gorgeous duo from Mavala. And it was on sale too - 


The colours are 12 Berlin (grey) and 30 Mexico (purple). Obviously.
Didn't really know what to do with them so I made it up - 


- Start with two basecoats
- Then two coats of the grey - 


- So nice!
- Next I painted the purple triangles with a small brush - 


- Next, using a dot of clear varnish as glue, I added the blue rhinestones, with an orangewood stick, for a bit of extra jazz.
- Top coat to finish.

Another one that came from nowhere that I love the most-est!!

Right. Well, 'till the next one!
Stay fabulous kids :)

WN x